Saturday, July 31, 2010

CHA Envy 3

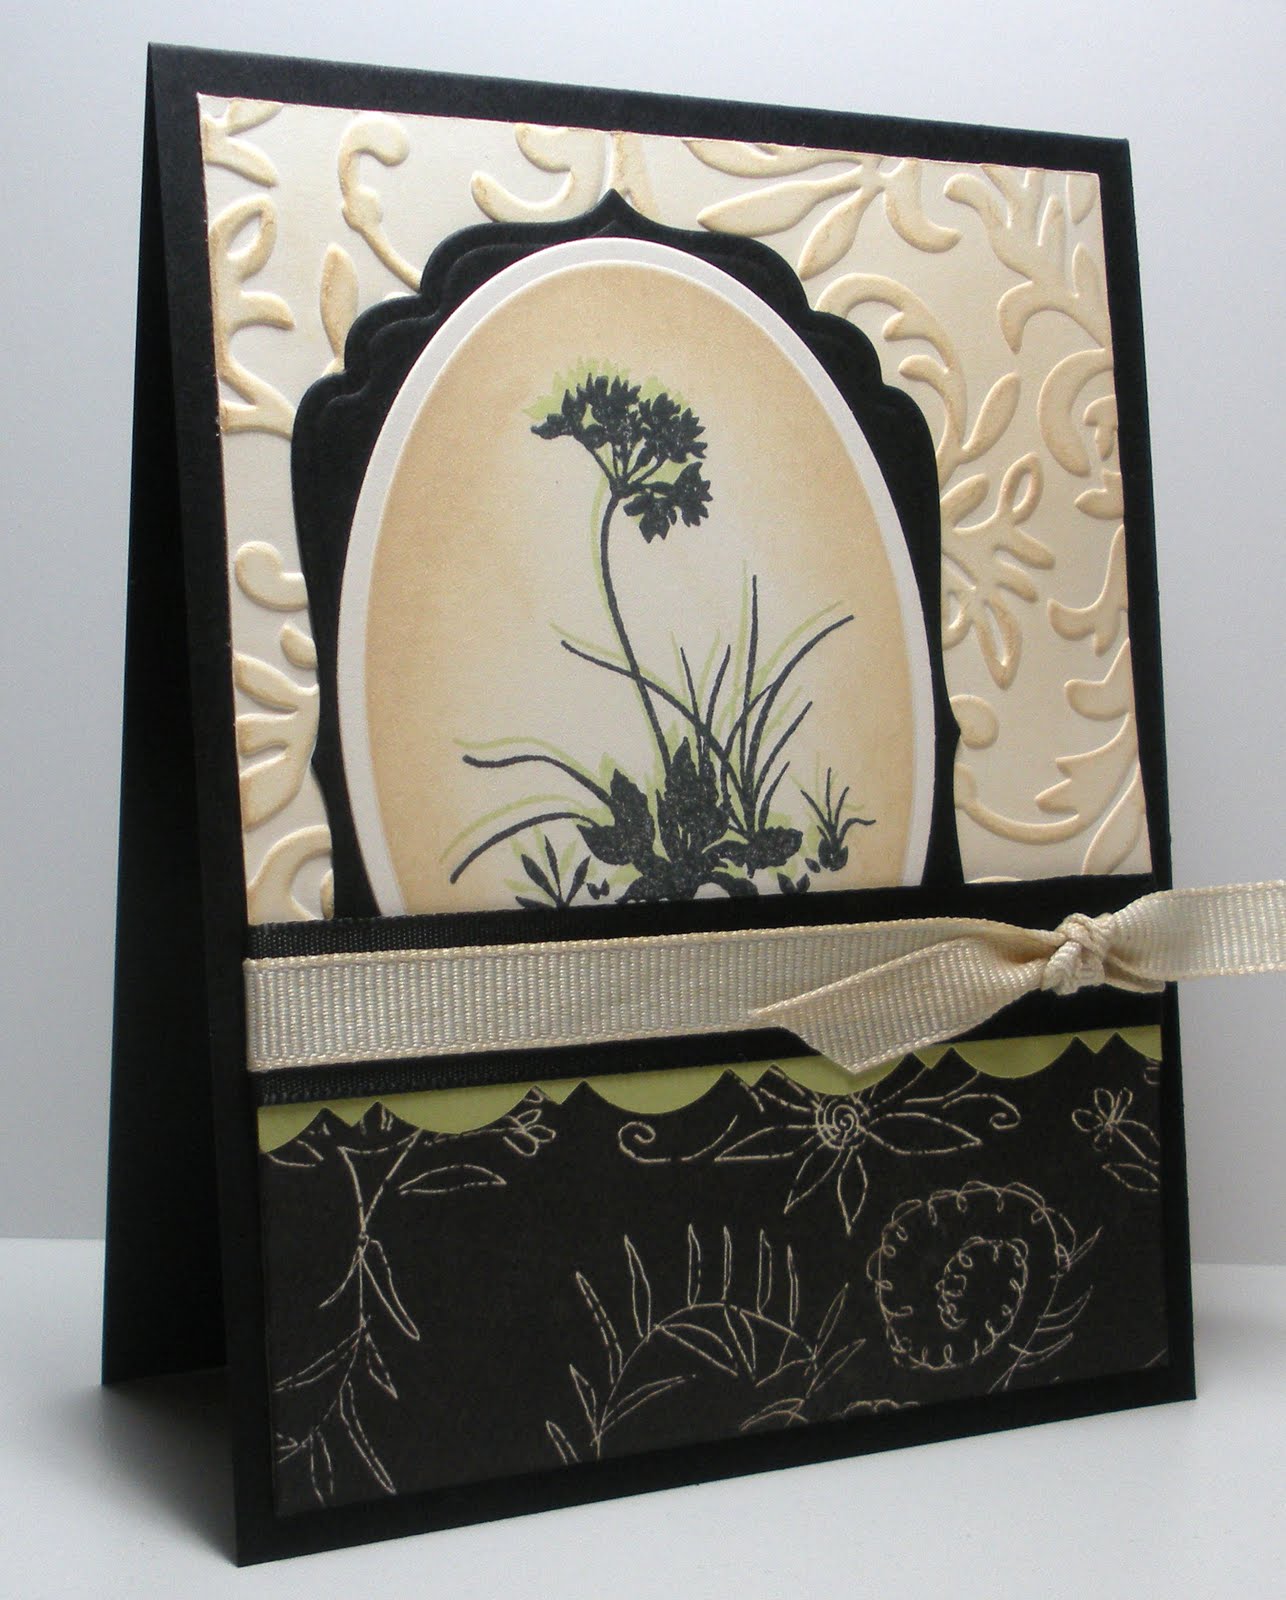
I'm back with my entry for CHA Envy Challenge 3 over at Stamp TV. For this challenge you have the opportunity to win Melanie's new stamp set for August! I chose the color challenge navy, olive, and ivory for this challenge. This is a pretty simple card, so I will just add the details. Thanks for looking!

Details:

Stamps: Enjoy the Sunshine
Ink: Versamagic Night Sky
Paper: American Crafts navy and olive, gkd ivory, chatterbox patterned paper
Accessories: Nestabilities: Curved Rectangles, circles, 1 3/4 inch punch for sentiment, ribbon: from Michaels, brads, hole punch for the circles under the brads

Have a great day!

Friday, July 30, 2010

CHA Envy


The girls over at Stamp TV are having some fun CHA envy challenges, for those of us who aren’t able to make it to CHA. The first challenge was to use a stamp an image sideways, upside down, etc. So I placed my sentiment sideways on my card. I also used my score buddy and score bug to create the embossed background on the video shared from CHA. The second challenge was a color challenge: yellow and black. For this card I made a long tent card, my flourish just needed a little more room. :) I also used the rock n roll technique on the stamped butterfly. There is a third challenge that I will be working on as well. You can use the colors navy blue, olive, and ivory or try to duplicate the pattern in your patterned paper in your card. Check it out at Stamp TV!
Card Details:
CHA envy 1:
Stamps: GKD: Enjoy the Sunshine, Elegant Flowers
Paper: GKD red, white, black onyx
Ink: Memento Tuxedo Black, versamark
Accessories: score buddy, score bug, copic markers, tab punch, stapler, black embossing powder, ek success border punch

CHA envy 2:
Stamps: GKD Enjoy the Sunshine
Paper: GKD: black and white, American Crafts yellow
Ink: thatched straw and black versamagic dew drops, memento tuxedo black
Accessories: sizzix flourish die cut, nestabilities
Thanks for looking!

Wednesday, July 28, 2010

Accent Color Challenge

This week at Stamp TV the color challenge was to use black and ivory with one accent color. I chose my accent color to be lime green. It is one of my favorite colors and I'm even thinking about painting my craft/office room lime green! I used a patterned paper by Crate Paper on the bottom. For the top I embossed it with Cuttlebug's Victoria embossing folder and a distressed it with antique linen distress ink.

The focal image is from the Enjoy the Sunshine Stamp TV kit and used the drop shadow technique again. This time I dropped the shadow more so it was more evident. For the drop shadow I used Memento new sprout ink and tuxedo black ink, cut it out and embossed it with nestabilities, and then distressed the edges with antique linen distress ink. For the frame I used another nestabilities cut out and embossed. The ribbon is a black satin ribbon with antique white grograin that I ran the antique linen distress ink pad over to match the rest of the card. I also added a sliver of lime green under the ribbon that I edged using a martha stewart border punch.

Card Details:
Stamps: Enjoy the Sunshine GKD
Paper: GKD: black onyx and ivory, crate paper, lime green by paper cut
Ink: Memento: tuxedo black and new sprout, Distress ink: antique linen
Accessories: Nestabilities: petite ovals and labels 4, Cuttlebug embossing folder: Victoria, ribbon: black satin and antique white grograin, martha stewart border punch: Cornice


That's all for now. Thanks for stopping by!


Tuesday, July 27, 2010

A Sketch and a Bookmark

When I saw the sketch over at Stamp TV this week, I was a little stumped. I wasn't sure what to do with the triangle corner. Then I remembered I had seen a tutorial on SCS not that long ago on making a corner bookmark. Needless to say the wheels started turning. I had to alter my bookmark a bit to fit on the card, but it all worked out! And it works out great because my mother-in-law's birthday is coming up and she loves to read! So this one will be for her! I also had to flip the sketch so the bookmark wouldn't be upside down.

This picture displays the card after the bookmark has been removed. I had it slide under the white mat of the card.


And here's a close up of the bookmark alone. I decorated both sides of the bookmark the same.
Details:
Stamps: Enjoy the Sunshine Stamp TV Kit Gina K
Paper: GKD white and red, DCWV summer stack
Ink: Memento Tuxedo Black
Accessories: Nestabilities plain square and scallop square, Copic Markers, SU Scallop Edge Punch, 1 1/2 inch scallop circle punch, 1 1/4 inch scallop circle punch, 1 1/4 inch circle punch, 1 inch circle punch, martha stewart butterfly punch
Thanks for looking!


Monday, July 26, 2010

Featured Stamper Challenge


This week ravengirl was the Featured Stamper at SCS. She has a wonderful gallery! I chose this card to case: Dirty Little Butterflies. I used a different color scheme and I used a paper punch instead of a stamp for this challenge. I punched the butterfly out of glitter cardstock, it is nice and shimmery in real life. I love how quick and easy this was! Thanks for looking!


Card Details:
Stamps: Amuse
Paper: GKD white, chatterbox, dcwv glitter stack
Ink: memento tuxedo black
Accessories: tonic butterfly punch


Sunday, July 25, 2010

Another Card for the Stamp TV Guest Designer

So I was browsing through Stamp TV and remembered this video on Creating a Drop Shadow. So I thought I would make a clean and simple card using this technique. My focal image is from the Enjoy the Sunshine Stamp TV kit. I stamped it in new sprout by memento then tuxedo black. I really like how it adds just a touch of color. Instead of adding layers to this card I embossed the frames using Gina's video tutorial Nestabilities: Embossing only for the focal image and sentiment using nestabilties. For the focal image I popped it up after cutting it out with a circle nestabilities. The sentiment is embossed with a tag nestabilities. Before I adhered the white panel to the card, I attached some black stitched ribbon from the Enjoy the Sunshine Stamp TV kit.


I used the same technique on the inside.


You can see the green accent more in this picture.


I also used this technique on the sentiment, and added some brads to the embossed tag.

Card Details:

Stamps: Enjoy the Sunshine

Ink: Memento: new sprout and tuxedo black

Paper: GKD white and black onyx

Accessories: Nestabilities: Labels 2, circle, and Double End Tags, brads, black stitched ribbon, pop dots.


Thanks for looking!


Stamp TV Favorite Technique


Gina K. is searching for a new Center Stage guest design team member for August, so I decided I am going to give it a go! She wants us to choose our favorite technique that she has shared over at Stamp TV. It was hard to choose so I went with my most recent favorite, Reverse Nestabilities. I love the dimension it gives to the card. I used Label 9 and circle nestabilities and a circle punch to make the opening for the focal image on this card.


For the sentiment I first punched out the label and then I used my stamp a ma jig to place the "I've been." After inking up the stamp I placed scotch tape over the "thinking about you" part of the stamp, and then stamped. I did the same for the "thinking about you" only I stamped it on a small piece of white paper to place behind the punched out label.

For the focal image I used Gina's video on Happy Fish Copic Coloring. I never would have thought to color in the fish bowl first. I would have been trying to color around that fish! I love how realistic it looks colored this way. When I stamped the fish bowl I didn't ink up the jumping fish so I could place him out of the focal image circle. Then I thought that I would add even more dimension on this card. I stamped the jumping fish on heavy weight pure luxury white paper, colored and cut it out. I attached it to the card using a pop dot to make him look like he's coming at you! ;)


For the inside of the card I had a little bit of the patterned paper left from the focal image, so I used a scallop border punch to fancy it up, and then I stamped the fish image again. It is so fun to color this, I couldn't resist!


Card Details:
Ink: memento rich cocoa and tuxedo black
Paper: GKD green apple, chocolate kiss, white, and patterned paper from Enjoy the Sunshine Stamp TV kit
Accessories: Labels 9 Spellbinders, circle spellbinders, 2 1/2 inch circle punch ek success, modern label punch, offray grograin ribbon, pop dots
Copic Colors: BG000, BG01, Y21, Y38
Thanks for looking!

Saturday, July 24, 2010

Stamp TV Sketch


Wow, it sure has been busy around here! Summer is just flying by on me! I am late in making this card for my brother, his birthday was a couple of days ago. I used the sketch from Stamp TV for this card, I flipped the sketch to make it work with the image that I was using. For those Stamp TV followers you can see I got my inspiration from Gina’s card that she made with her Score Buddy and distressing technique. I just loved her card and had to make one too! It was a great way to use my new Score Buddy, which I really am liking as I use it more. I really like the 1/8” increments for making borders, and the size is perfect for card makers! I also made a visit to Gina’s store this week and purchased the Enjoy the Sunshine Stamp TV kit, and a few other goodies of course! It is always so neat to see all of the products in her store, I know it is all online but there is something about seeing it in the store that is more fun! I also always seem to purchase a lot more when I am there rather than online, I guess I am a compulsive shopper! LOL! That’s all for now here are the details of the card:
Paper: Basic Grey Archaic 6x6 pad, GKD chocolate kiss and ivory
Ink: memento rich cocoa, distress ink antique linen
Accessories: Score Buddy, eyelets, 1 3/8 & 1 ½ in circle punches, SU modern label punch, green ribbon from Hobby Lobby, thin twine, pop dots

Friday, July 9, 2010

Thinking of You


We recently visited the Cooks Corner in Green Bay and while I was there my husband spotted a display of handmade cards for sale! Of course I had to check them out, I love getting inspiration from others! One of the cards I saw had a layout like this and I thought it was so fun, and something different! I had to try one! I started with the sentiment from Verve and used a variety of punches to make the gradual matting. Thank goodness I have such a variety of punches, it made life pretty easy for this one.

Stamps: Verve: Circular Sayings, SU: Thoughts and Prayers

Punches: ek success and marvy circle punches, su scallop circle

Accessories: gold brads, ribbon by American Crafts

Ink: Memento Rich Cocoa

Paper: DCWV paper pad, Bazzil Cardstock, GKD Cardstock

Thanks for looking!


Thursday, July 8, 2010

Sketch Challenge


What a fun sketch challenge Splitcoast had this week! I took one look at it and knew exactly what I wanted to do! Don’t you love it when that happens?! Now sometimes this can backfire, because what I picture in my head and what it actually looks like when I make it can look like two entirely different cards!! But this time I was pleasantly surprised that it turned out great. The colors I chose aren’t usually colors I use, but I am bound and determined to use up some of my paper pads that I have purchased! And I in the end I really like the colors!
Card Details:
Base of the card is GKD pure luxury white cardstock.
Patterned Paper DCWV summer stack
Stamps: Stampendous, SU Vintage Label
Ribbon: From Michaels $1 bin
Nestabilities: Circles and Lotus Penndant

Punch: Martha Stewart

Thanks for looking!


Sunday, July 4, 2010

Post It Note Organizer


Happy 4th of July everyone! I do not have a patriotic post today, but I do have a post it note organizer! I watched this tutorial on Chic n Scratch Live on how to make one. I love the little pocket on the side, it would be perfect for receipts or lists. I am a bit of a post it note freak so I'm sure I will be using this fairly often! Thanks for looking!


Friday, July 2, 2010

Oh Happy Day!


I am loving this new Martha Stewart border punch! I was fiddling around with the border and corner punch making this border go all around, which isn't always very easy even with the provided measurements... So when I had one turn out, I had to turn it into a card. The image is from Michaels dollar stamps bin. I colored the petals with a light pink copic, I believe it was light cherry pink? Then I used the same marker to color in the inside of my butterfly to provide some contrast. For the body and antennae I used DMC floss and made a slip knot over the butterfly then I knotted the ends to create the antennaes. The sentiment is by Amuse. Thanks for looking!


Thursday, July 1, 2010

Caught a bug?


I was shopping a couple of days ago at my lss, and saw a similar card in their card examples. I thought it was too cute, and had to make one myself. I started with a 4.25x4.25 card base. The next layer I punched out the Martha border punch and then trimmed it to 4x4. I wove a strip of red paper in the border and added black pearls. Next layer I embossed with Swiss Dots CB folder, and punched out a scallop circle using a martha punch. Behind this piece I punched out a 1 inch circle from a black square and adhered it behind the scallop circle. To create the ladybug image I layed down the red piece and traced the circle lightly in pencil so I knew where to stamp my image and after stamping and coloring my image I erased the line. I used pop dots to adhere this piece to the card. I computer generated the sentiment and cut it out with nestabilities.


Hope you like it! Thanks for looking!